

RICK DAVIDSON:


For this tutorial you’ll need:


SKULL SHADOW – Duplicate the skull layer and
erase all but the areas you want deep shadow. The eye sockets in this
case. Then adjust the layer style to a deep brown with a COLOR BURN
blend mode

SKULL HIGHLIGHT – Duplicate the original
skull layer again, remove the layer styles and crank the contrast right
up to get a few strong whites for highlights. Set the layer blend mode
to SCREEN. This will give the teeth some punch.


Final Preview:
A quick analysis of a few movie posters – you’ll notice a trend in
either warm or cool gradient backgrounds with one highlight.
either warm or cool gradient backgrounds with one highlight.
For this tutorial you’ll need:
- One skull or suitable spooky image
- One Aztec/Mayan type carving
- One hero shot, preferably backlit (of course yourself!)
- Shots of rocks, walls, trees, steps for a backdrop
- The SF Fedora Font set (get it here)
A standard movie poster is 27 x 40" (68.6 x 101.6cm) with about
150ppi (pixels per inch) but that’s a big file so choose a size that
suits.
150ppi (pixels per inch) but that’s a big file so choose a size that
suits.
The Background
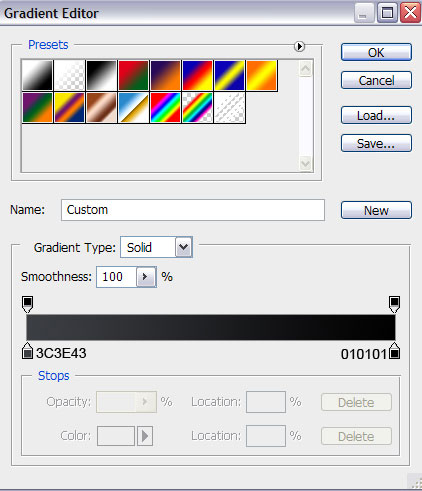
We’ll start with a gradient of warm color. Bring up the gradient editor and add color points as shown, then apply.
Drop in and clearcut the skull, then use the EDIT>TRANSFORM>WARP
tool to distort the image to a suitably scary state. DESATURATE to
lose the color. I applied a PLASTIC WRAP filter to give it some sheen.
tool to distort the image to a suitably scary state. DESATURATE to
lose the color. I applied a PLASTIC WRAP filter to give it some sheen.
SKULL COLOUR – We’ll place the skull large at the
top, and add a layer style by double clicking the skull layer in the
layers tab. We’ll give it a COLOR OVERLAY (we’ll use a lot of these)
setting the color to a bright orange and using a vivid light blend
mode.
top, and add a layer style by double clicking the skull layer in the
layers tab. We’ll give it a COLOR OVERLAY (we’ll use a lot of these)
setting the color to a bright orange and using a vivid light blend
mode.
SKULL SHADOW – Duplicate the skull layer and
erase all but the areas you want deep shadow. The eye sockets in this
case. Then adjust the layer style to a deep brown with a COLOR BURN
blend mode
SKULL HIGHLIGHT – Duplicate the original
skull layer again, remove the layer styles and crank the contrast right
up to get a few strong whites for highlights. Set the layer blend mode
to SCREEN. This will give the teeth some punch.
Now we’ll flatten the image and apply a little DRY BRUSH filter and some NOISE to give it a painterly gritty effect.
Ok that’s the background. Now a backdrop to frame our ‘hero’. Drop in
some background rock or tree life, and DESATURATE. Apply plenty of
contrast for deep highlights. Now apply another COLOR OVERLAY layer
style using a deep brown color and linear light mode. Set the layer
mode to SCREEN.
some background rock or tree life, and DESATURATE. Apply plenty of
contrast for deep highlights. Now apply another COLOR OVERLAY layer
style using a deep brown color and linear light mode. Set the layer
mode to SCREEN.
Now DUPLICATE the layer, remove the styles and set the layer mode to
HARD LIGHT. A little DRY BRUSH can’t hurt either. Erase the edges a
little to blend with the background.
HARD LIGHT. A little DRY BRUSH can’t hurt either. Erase the edges a
little to blend with the background.
Now let’s add some steps for our hero to stand on – another greyscale
image with a COLOR OVERLAY layer style. This time set to SOFT LIGHT
mode and a light brown color. We set the layer mode to LUMINOSITY on
this one. As you might be starting to guess, there is experimentation
here. Play. Learn. Enjoy.
image with a COLOR OVERLAY layer style. This time set to SOFT LIGHT
mode and a light brown color. We set the layer mode to LUMINOSITY on
this one. As you might be starting to guess, there is experimentation
here. Play. Learn. Enjoy.
Now we pick up speed. We take our Aztec carving, color it rich blue
using the HUE/SATURATION tool, hollow it out using the eraser tool and
place it at the base. Then we create a new layer and paint over it
with black (with some opacity) so it’s subtle.
using the HUE/SATURATION tool, hollow it out using the eraser tool and
place it at the base. Then we create a new layer and paint over it
with black (with some opacity) so it’s subtle.
The hero
Now we’re ready for our hero. Create a new layer and airbrush in a
white glow to sit behind the character. This is our focal point. Now
add a layer style to this and use an OUTER GLOW with a yellow color.
Glow on glow. Now we’ll paste in our character (handsome fellow…) To
give it some inky grunt, I like to apply UNSHARP MASK with a high
radius. Adjust LEVELS to a point you’re happy with, where the hero
looks a part of the scene.
Now DUPLICATE the hero layer. Set the new layers mode to LUMINOSITY, and then apply a layer effect. In this case we want three effects to ‘style like Struzan’.
Outer Glow – This will give the character an
ink-like outline. Set this to a very dark brown, blend mode to OVERLAY,
a little SPREAD and a little NOISE until you get a rough brown outline
ink-like outline. Set this to a very dark brown, blend mode to OVERLAY,
a little SPREAD and a little NOISE until you get a rough brown outline
Color Overlay – This will give the character the
same tone as the rest of the image. Set blend mode to OVERLAY and
choose a soft brown to blend the character with the scene.
same tone as the rest of the image. Set blend mode to OVERLAY and
choose a soft brown to blend the character with the scene.
Stroke – this will mimic the halo outline of a backlight. Set color to white, blend mode to OVERLAY, position to CENTER.
Now to give the character a painterly feel, apply a little DRY BRUSH filter, excluding the face with a feather selection. A little NOISE and UNSHARP MASK perhaps for good measure.
Just text to go
Almost there! Just the text to go. For this you’ll need the Fedora set which you can find here.
Enter name here! To this text we’ll apply another layer style, this
time with a heavy black DROP SHADOW, a GRADIENT OVERLAY (as shown) and
a black STROKE.
time with a heavy black DROP SHADOW, a GRADIENT OVERLAY (as shown) and
a black STROKE.
Now we’ll select the text and click the CREATE WARPED TEXT tool in the
text tool bar. Here we can use the ARC selection to bend the text
slightly. Then rotate a little for lift. Indy would be proud.
text tool bar. Here we can use the ARC selection to bend the text
slightly. Then rotate a little for lift. Indy would be proud.
Using the FEDORA TITLE font, we can complete
the movie title… and our poster! Drew often uses paint spatter to
soften his work, you could mimic this for a finishing touch by
downloading or creating your own photoshop brush. Might cover that in
another tutorial.
the movie title… and our poster! Drew often uses paint spatter to
soften his work, you could mimic this for a finishing touch by
downloading or creating your own photoshop brush. Might cover that in
another tutorial.
All kudos to Drew Struzan for this incredible style, his posters have
been an integral part of cinema for as long as I can remember. Hell I
grew up on them.
been an integral part of cinema for as long as I can remember. Hell I
grew up on them.
I hope you enjoyed this tutorial. Look forward to more in the future.
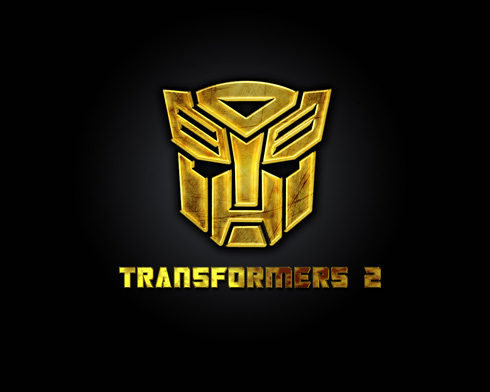


Transformers 2: Revenge of the Fallen – movie wallpaper
In this tutorial I am going to show you some cool tricks to get some awesome custom wallpapers. First we need to find our subject, I chose Transformers 2: Revenge of the Fallen movie, because they were my favorite cartoon and still are the coolest toys ever.
FINAL IMAGE PREVIEW
Let’s create a new file (File>New) of 1280×1024 px and 72 dpi. Using the Paint Bucket Tool (G), it’s possible to give the new file black color.
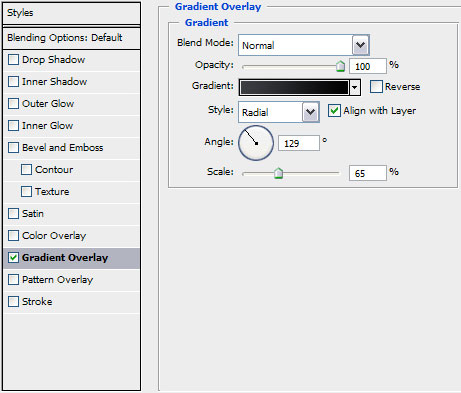
Set the next parameters for the made layer: Blending Options>Gradient Overlay
Gradient’s parameters:
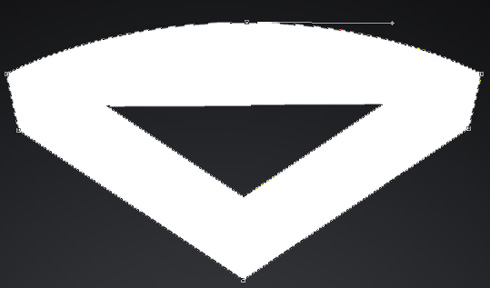
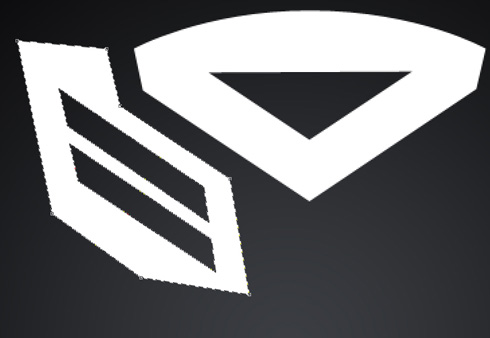
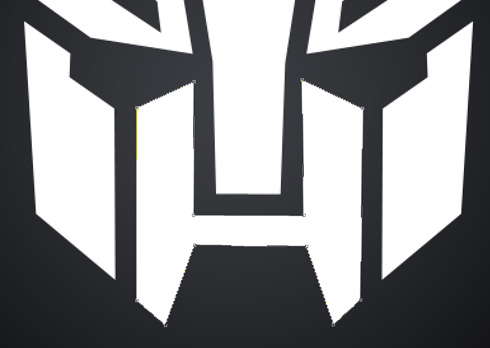
Next we’ll try to draw the face of a robot transformer. In this case we’ll select the Pen Tool (P) and the Convert Point Tool for the necessary corrections. All the elements have white color.
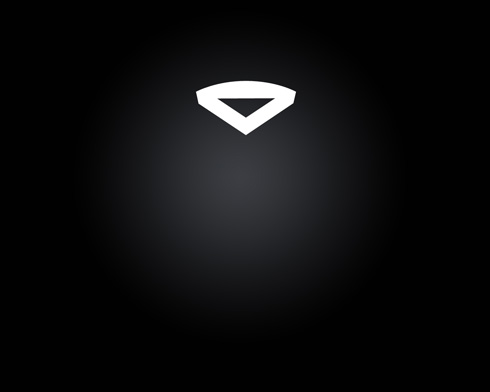
Make a copy of the last made layer and select Free Transform option to turn over the copy, situating it the same way shown below:
For the next element we’ll choose the same tools indicated above:
Make a copy of the last made layer containing the new element and select again Free Transform option to turn over the copy, placing it the way indicated below:
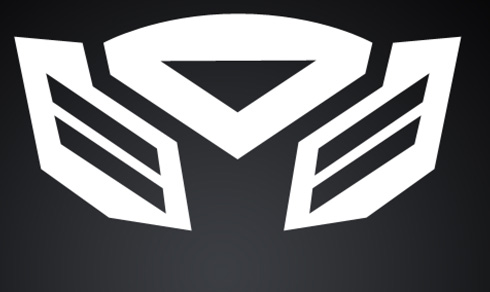
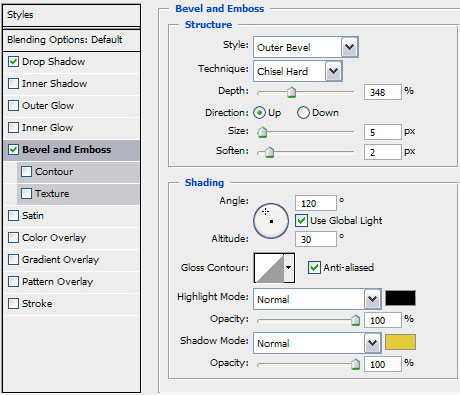
Now we must put together all the elements composing the robot’s head into a single rasterized layer. In this case we’ll just press Ctrl button, mark out the corresponding layers and then press Ctrl+E. The new layer will need the next demonstrated parameters: Blending Options>Drop Shadow
Blending Options>Bevel and Emboss
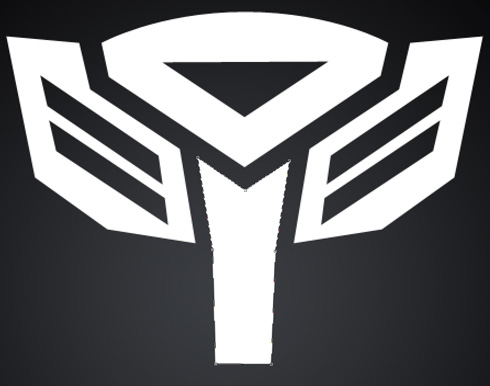
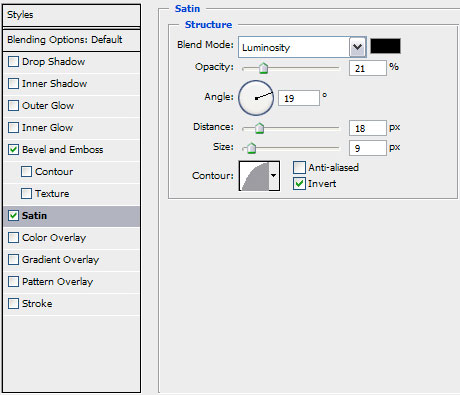
Next make a copy of the rasterized layer containing the transformer’s head and select again the Paint Bucket Tool (G) to fill each element with the color #FFD528. Change also the parameters of the copy’s layer: Blending Options>Bevel and Emboss
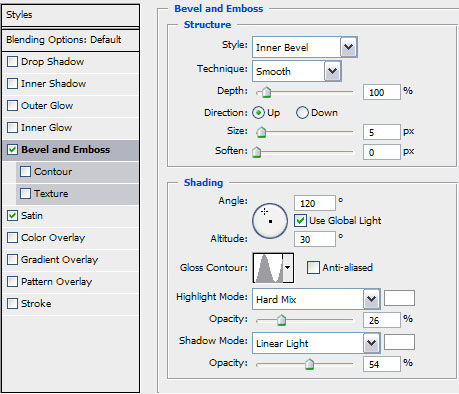
Blending Options>Satin
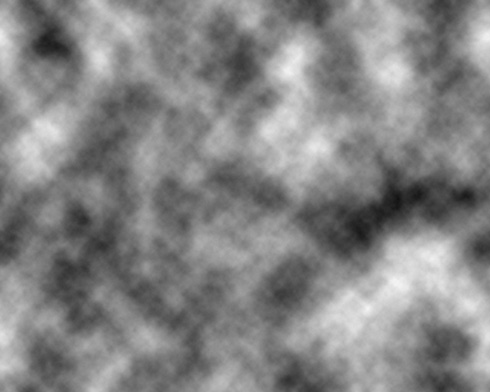
Create a new layer again which must be painted with black color, selecting for this operation the Paint Bucket Tool (G).
Choose for this layer the selection from here: Filter>Render>Clouds
Photoshop Plasma TV
Here is a preview of what your completed Black Plasma TV will look like.
Now let’s get started…
Steps 1 through 8
Step 1:
Let’s start out by creating a new file. I used a 600×300 pixels canvas
set at 72dpi, and I filled my background with a white color. In a new
layer draw a black rectangle with 385 x 180 px dimensions.
set at 72dpi, and I filled my background with a white color. In a new
layer draw a black rectangle with 385 x 180 px dimensions.
Step 2:
Under Layer Style(Layer > Layer Style) add a Gradient Overlay and Stroke blending options to your black rectangle layer.
Step 3:
Your black rectangle should now have a gradient design with a thick black border.
Step 4:
Create a new layer, below the screen of your Plasma draw a smaller black rectangle with 175 x 21 px dimensions.
Step 5:
Under Layer Style(Layer > Layer Style) add a Gradient Overlay and Stroke blending options to your black rectangle layer.
Step 6:
Your second black rectangle should now have a light gradient effect.
Step 7:
Create a new layer, below the second black rectangle draw a thin black rectangle with 187 x 7 px dimensions.
Step 8:
Under Layer Style(Layer > Layer Style) add a Drop Shadow and Gradient Overlay blending options to your thin black rectangle.
Steps 9 through 16
Step 9:
Create a new layer, on the left side of the screen draw a black rectangle with 36 x 181 px dimensions.
Step 10:
Under Layer Style(Layer > Layer Style) add a Gradient Overlay blending option to your black rectangle layer from step nine.
Step 11:
Now create another new layer and next to the plasma screen draw a white rectangle with 43 x 181 px dimensions.
Step 12:
Under Layer Style(Layer > Layer Style) add an Inner Shadow and
Gradient Overlay blending options to your white rectangle layer.
Gradient Overlay blending options to your white rectangle layer.
Step 13:
Add the same design structure for the right side of the plasma.
Step 14:
Select your Horizontal Type Tool and above your screen under the
options palette set the font family to Arial, bold, 7 pt, strong and
#333333 color shade. In a new text layer type the brand name of your
plasma just below the screen.
options palette set the font family to Arial, bold, 7 pt, strong and
#333333 color shade. In a new text layer type the brand name of your
plasma just below the screen.
Step 15:
Now insert a picture with 365 x 148 px dimensions on the center screen.
You can save the picture below if you want to use the same picture.
You can save the picture below if you want to use the same picture.
Step 16:
Under Layer Style(Layer > Layer Style) add an Inner Glow and Stroke blending options to your picture layer.
The final design
And there you have it your Black Plasma TV Design.
No comments:
Post a Comment