

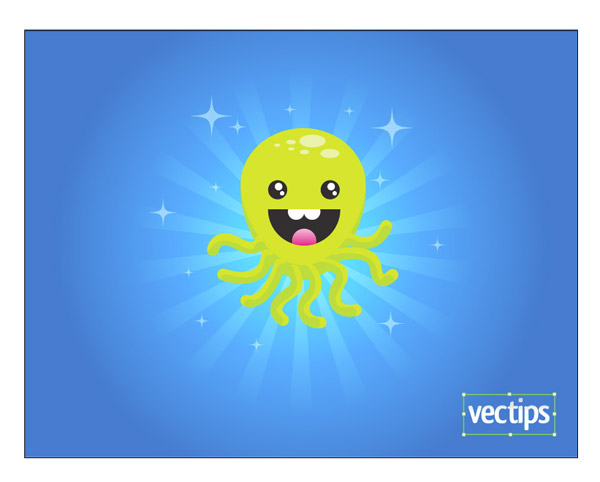
Final Product What You'll Be Creating
Step 1
Create a new document 11 inches wide by 8.5 inches tall. With the Ellipse Tool, create an ellipse that is 2.5 inches by 2.5 inches. Fill the ellipse with a green color and take off the Stroke. Next, use the Direct Selection Tool and select the bottom anchor on the ellipse and drag it down about half an inch.
Step 2
Select the oblong ellipse and Copy and Paste In Front. Select the newly copied object with the Selection Tool and grab the bottom anchor. Then squish the ellipse about a quarter of an inch up. Fill the slightly squished ellipse with a light green color.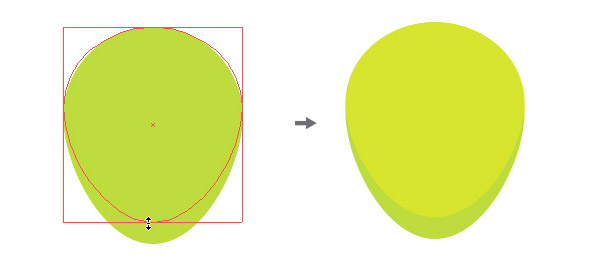
Step 3
With the Ellipse Tool, draw five to six elongated ellipses of varying size for the spots on the head (keep the ellipses the same proportion, just change the size). Make these spots a light green, lighter than the second head shape. Select both head shapes, the spots, and Group them by going to Object > Group, or by pressing Command+G.
Step 4
To start with the mouth, draw another ellipse around 1.5 inches by 1.5 inches. Then fill it with black and apply no Stroke. Next, draw a rectangle with the Rectangle Tool about half way down the black circle. Select both shapes, press the Subtract From Shape Area button in the Pathfinder Panel. Then press the Expand button.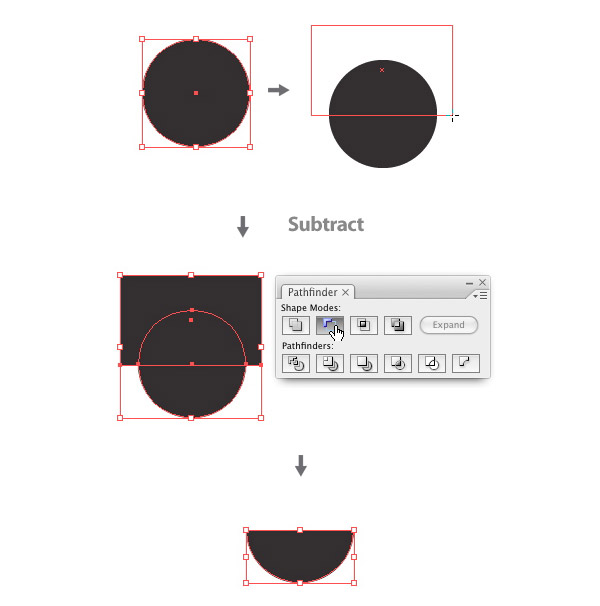
Step 5
For the teeth, draw an ellipse that is about .375 inches by .375 inches. Select the ellipse with the Selection Tool. Then hold down Alt+Shift, and drag to the right. Note that holding Alt copies the shape and holding down Shift constrains the movement. Select both shapes and Group them. Next, place the shape over the black mouth towards the top. Select both shapes and press the Horizontal Align Center button in the Align Panel.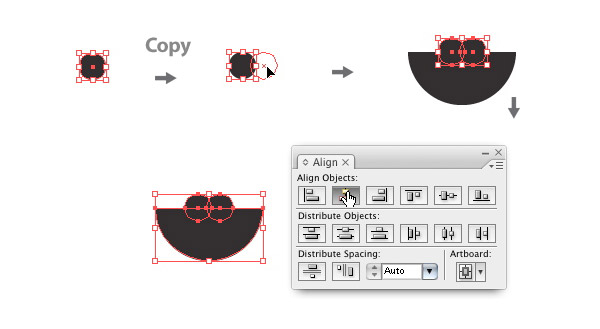
Step 6
Select the black mouth and Copy and Paste In Front. Select one of the mouth copies and the teeth and press the Intersect Shape Areas from the Pathfinder Panel. Change the shape to white and now you have teeth!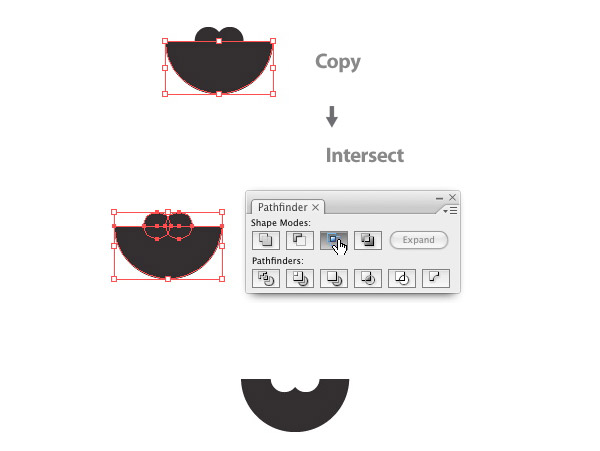
Step 7
For the tongue, draw a .5 inch by .5 inch ellipse over the mouth where the tongue should go. Select the mouth, teeth, and tongue and and press the Horizontal Align Center button in the Align Panel. Just like with the teeth, Copy the mouth and Intersect the tongue and mouth shapes.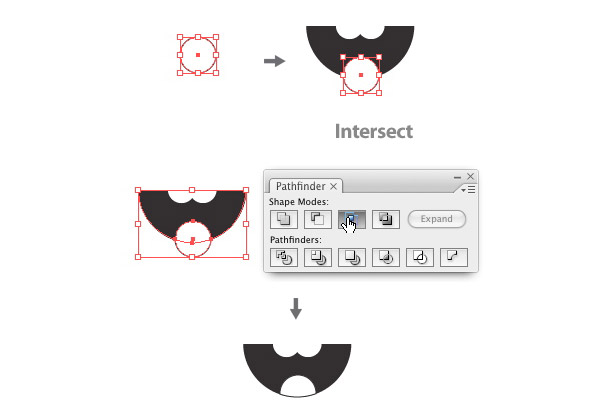
Step 8
Select the tongue and create a Linear Gradient from the Gradient Panel (select Linear from the Type drop-down menu in the Gradient Panel). Make the left Swatch a pink color and the right Swatch a light pink color. To change these colors, select the particular Swatch on the Gradient Slider in the Gradient Panel. Then mix the color in the Color Panel. With the tongue selected, adjust the Gradient with the Gradient Tool by clicking and dragging from the bottom of the tongue to the top.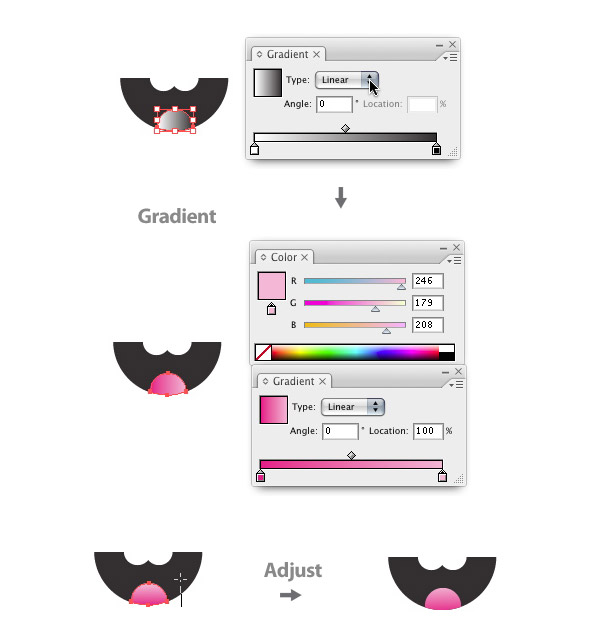
Step 9
Group the mouth, teeth, and tongue. Then place them over the head shape. Select all the shapes and Horizontal Align Center them.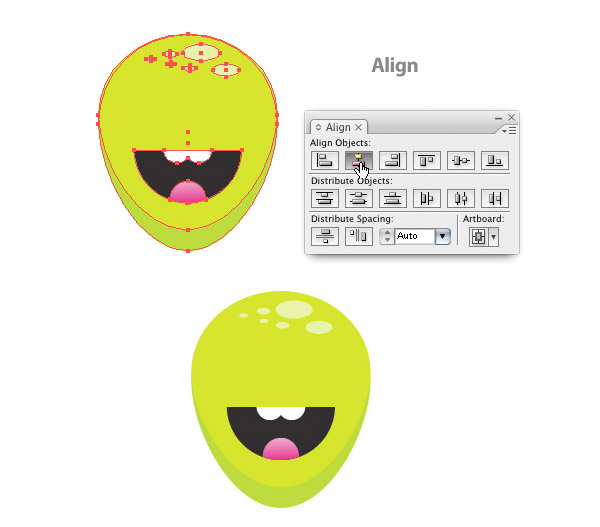
Step 10
Draw a ellipse that is .375 inches by .375 inches. Fill it with black. Draw another ellipse close to the top of the black ellipse, but smaller, and fill it with white. Next, draw another ellipse smaller than the white one, and place it closer to the bottom right of the black ellipse. Then fill it with white.
Step 11
Select the black ellipse, and the smaller white ones, and Group them. Place the eye on the head, flush with the left edge of the mouth. Next, hold down Alt+Shift. Then drag to copy the eye flush with the right side of the head.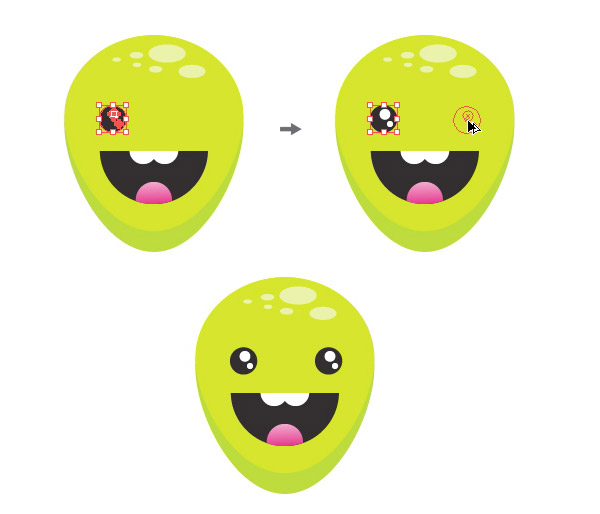
Step 12
Start with Pen Tool and draw a bézier curve a third of the way down the head. It doesn’t have tons of curves, it just needs to get the idea across of a simple tentacle. Try to get the path to end right before the darker color of the head.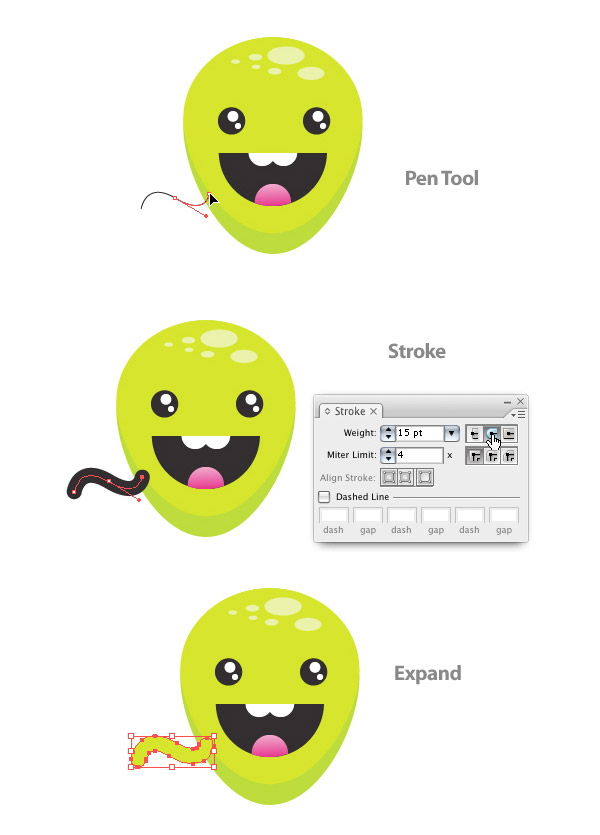
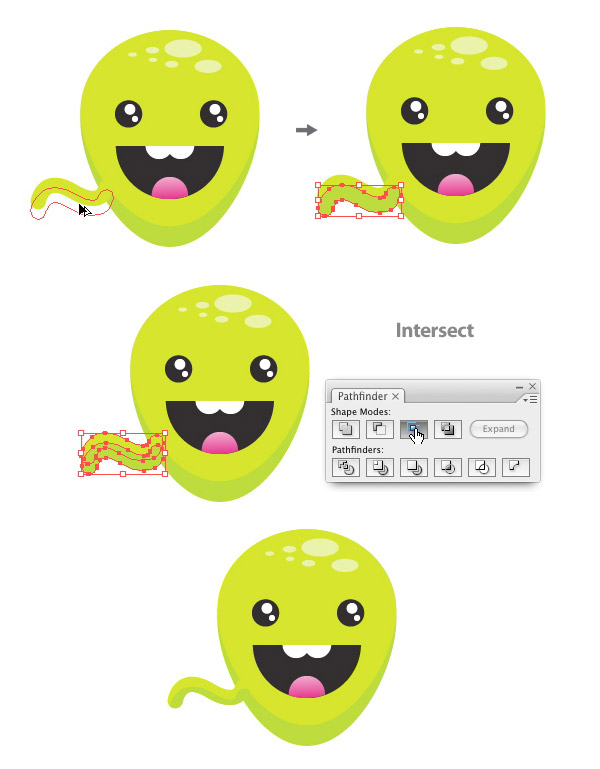
Step 13
Next, select the tentacle with the Selection Tool. Then hold down Alt+Shift, and drag to Copy the tentacle. Place it half way down the original tentacle. Change the color to your dark green.Select the original tentacle and Copy and Paste In Front. Select one of the original tentacles, and the darker one, and press the Intersect Shape Areas button in the Pathfinder Panel. Now you have one complete tentacle.
Step 14
Repeat these step until you have eight legs. Keep in mind the light source for the tentacle shadows. For the tentacles on the right, I dragged and copied the tentacle down and to the left to create the shadow. Select your octopus and place him in the center of the document.
Step 15
Start by creating a new layer in the Layer Panel. Drag it below the "octopus" layer. Then hide the "octopus" layer by pressing the Visibility Icon to the left of the layer in the Layer Panel.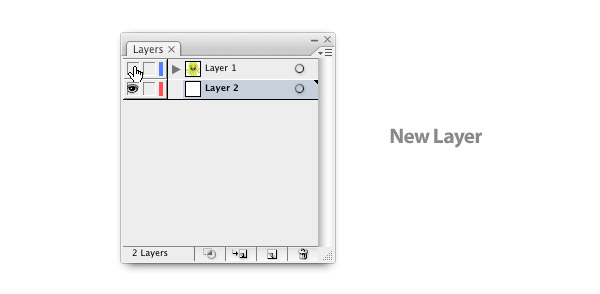
Step 16
Make a rectangle the size of your document with the Rectangle Tool. Then create a Radial Gradient in the Gradient Panel. Next, click just below the middle of the Gradient Slider to create a third Swatch. Make the left Swatch a light blue, the middle Swatch blue, and the right Swatch a dark blue.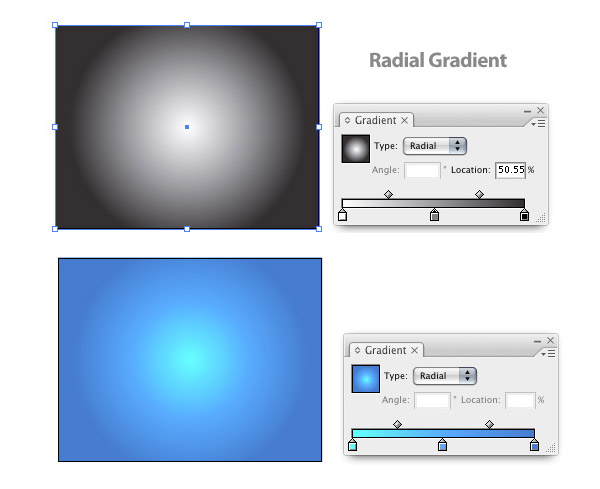
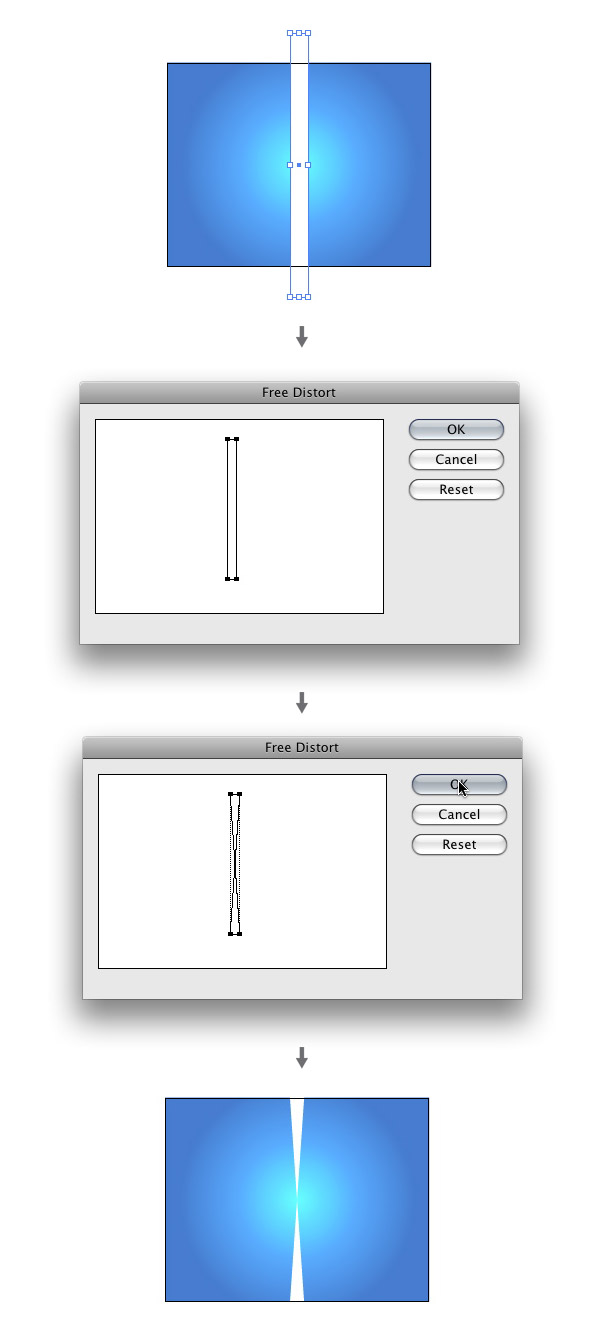
Step 17
Create rectangle the is .75 inches wide by 11 inches tall. Place it in the center of your document. Next, go Effect > Distort & Transform > Free Transform to bring up the Free Transform Dialog. This is where you will see your rectangle with some anchor points.Hold down Shift and click on the top left anchor point. Then drag it to the right anchor point’s position. Next, hold down Shift and click on the top right anchor point. Then drag it to the left anchor points original position. You might have to drag one point a little farther at first to select the one below it. Click Ok, and Expand the shape. Then fill it with white with no Stroke. It should look like two touching elongated triangles.
Step 18
With the transformed triangles selected, go to Object > Transform > Rotate to bring up the Rotate dialog. Change the Angle to 20. Then press the Copy button to copy the shape along with rotating it. Now you can transform again by going to Object > Transform > Transform Again (Command+D). Keep transforming until you are one step away from your original shape. Select all the transformed rectangles and Group them. Then change the Opacity to 50% in the Transparency Panel.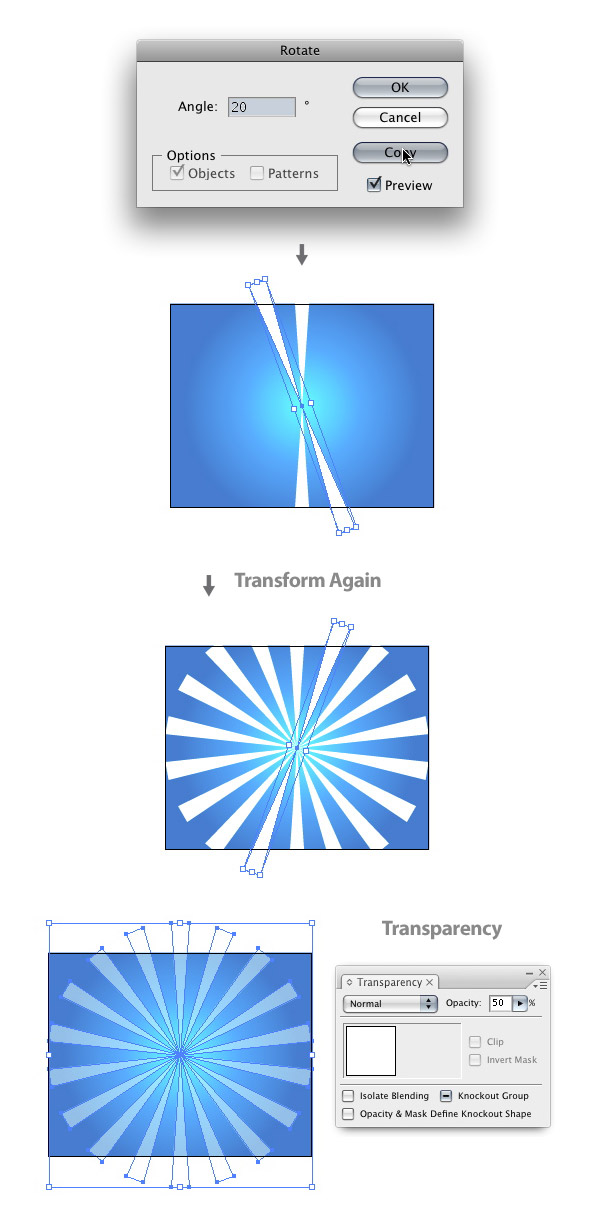
Step 19
Next, create an ellipse that is 7 inches by 7 inches and center it on you document. With the ellipse still selected, create a Radial Gradient from the Gradient Panel. Make sure the left Swatch is white and the right Swatch is black.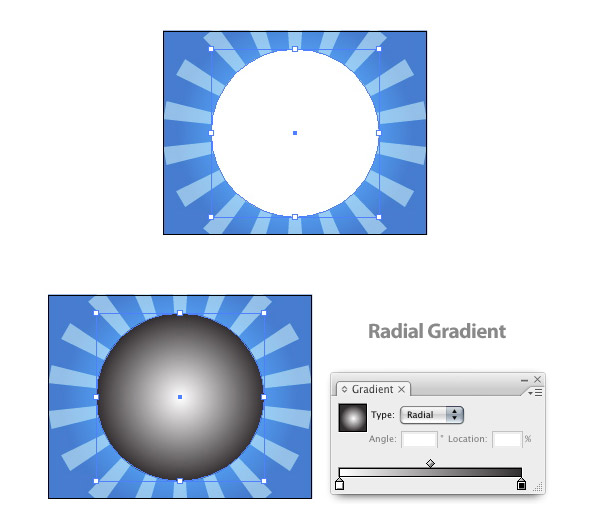
Step 20
Select the transformed rectangles and the ellipse. Then choose Make Opacity Mask from the Transparency Panel. Now you have a burst!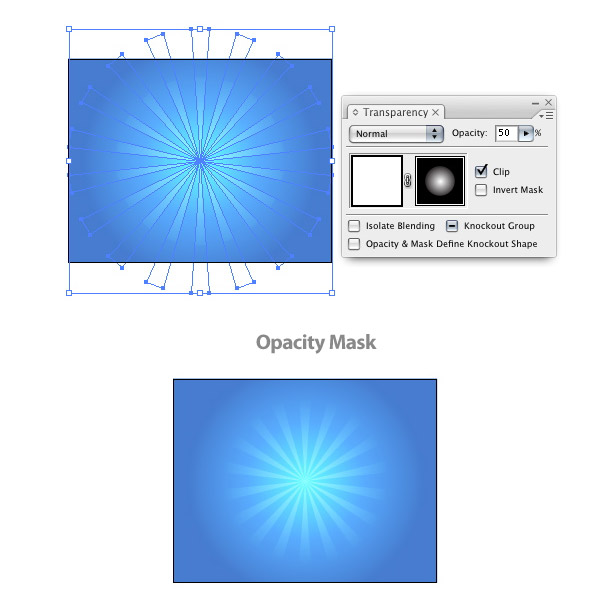
Step 21
Draw an ellipse that is .5 inches by .5 inches. Fill it with white and no Stroke. With the ellipse selected, go to Effect > Distort & Transform > Pucker and Bloat to bring up the Pucker and Bloat dialog. Then change the option to -70. Next, Expand the Appearance and change the Opacity to 50%. Now you can Copy and Paste the star wherever you like!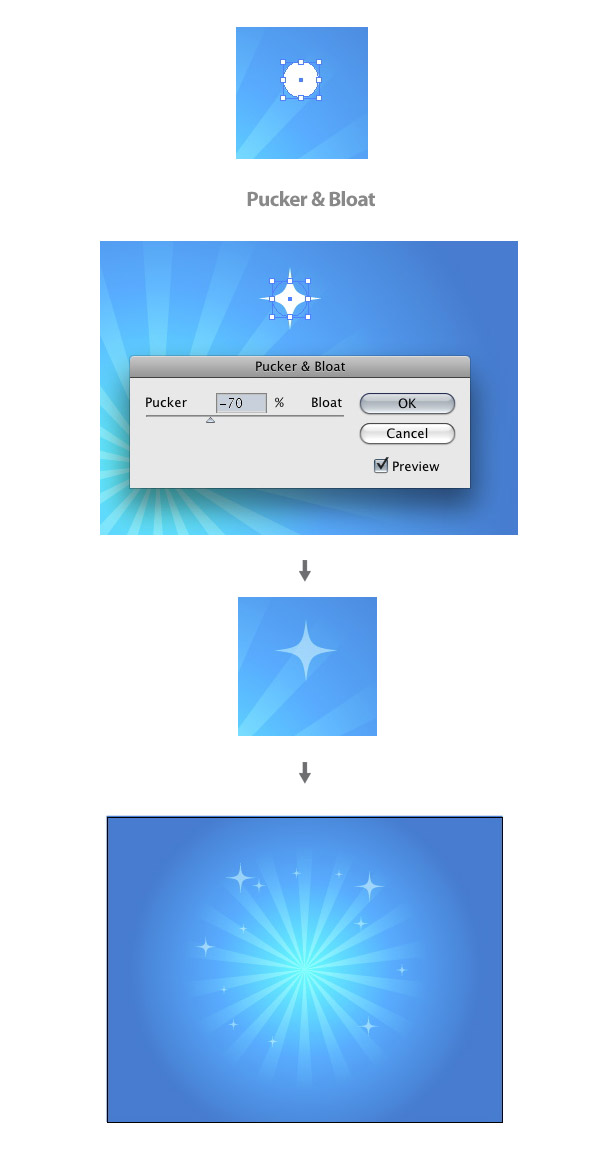
Final Image
Now all you have to do is press the Visibility Icon on the "octopus" layer in the Layers Panel to bring back the octopus, and you’re done!
No comments:
Post a Comment