

Final Image


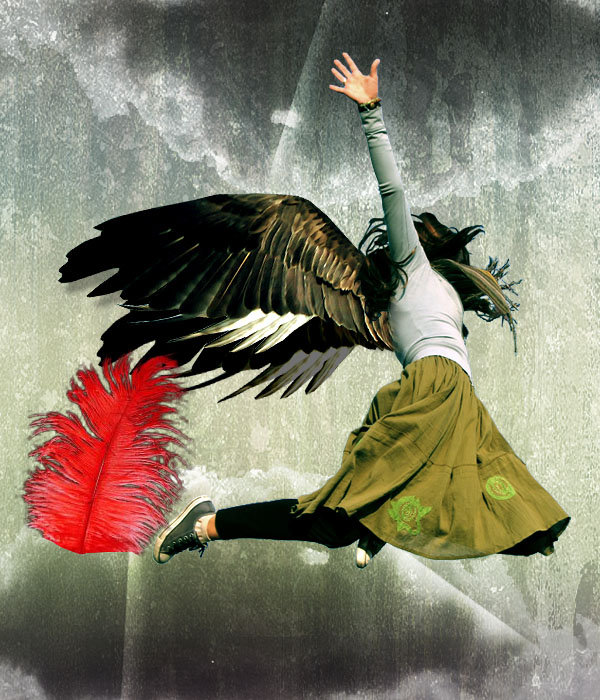


As always, this is the final image that we’ll be creating:
Step 1
Create a new document (600X700px).
Paste in a rough looking texture. I chose one of the ‘color fog’ textures available right here at PSDFAN. You can download the entire texture set here: Click here http://tipsforgraphics.blogspot.com/2013/03/colored-fog-textures.html. Stretch your texture to fit your canvas perfectly, and then call this layer ‘background texture’.
Step 2
Now go to image>adjustments>hue/saturation. Reduce this layer’s saturation to -80.
Step 3
Now go to image>adjustments>levels and apply the settings shown below. Reduce the layer’s opacity to around 20%.
Step 4
Now paste in a photo of some clouds, and place them at the top of your canvas. Remove the original sky background using the pen tool (or magic wand tool if it’s a solid color). This leaves only the cloud. Then duplicate this layer, and go to edit>rotate>rotate 180 degrees. Move this rotated cloud to the bottom of your canvas. Then merge these two layers together, and call the merged layer ‘clouds’.
Step 5
Now change your ‘clouds’ layer’s blend mode to ‘hard light’. Then duplicate this hard light layer and merge the two layers together. Reduce the opacity of this merged layer to 85%. Then go to image>adjustments>desaturate to grayscale the layer.
Step 6
Now select a texture from our Concrete Textures Set and paste it onto a new top layer.
Then change this layer’s blend mode to ‘multiply’ and reduce it’s opacity to 20%. Go to image>adjustments>hue/saturation and reduce your saturation to -85. If you feel that it’s necessary, go to filter>sharpen>sharpen, just to really bring out the details of the texture.
Step 7
Now create a new layer called ‘color gradient overlay’. Drag a linear gradient down vertically across your canvas. You can see the gradient that I used below. Then change this layer’s blend mode to ‘soft light’.
Step 8
Now create a new layer called ‘gradient fade’. Use your rectangular marquee selection tool to create a thin, rectangular selection. Then fill this selection with a white to transparent linear gradient (going across the narrow width of the selection). Then change this layer’s blend mode to ‘overlay’. Go to edit>transform>rotate and rotate the gradient to fit nicely across the top clouds in your canvas.
Step 9
Now duplicate this layer twice, moving each duplicate to a different part of your canvas, and rotating it, to make the gradients positioning appear random. Finally, merge all of your ‘gradient fade’ layers together, and use a large, soft eraser brush at a low opacity to erase their harsh edges (letting the end of each shape fade naturally into the main background).
Step 10
Now paste in an image of a girl jumping. This image was quite time-consuming to cut out, but it’s worth spending the extra time to get a good cut out. You can use either the lasso tool or pen tool to cut out your woman.
Step 11
Go to image>adjustments>levels and apply the settings shown below:
Step 12
Now go to image>adjustments>color balance and apply the settings shown below. This should help your woman blend better with your background.
Step 13
Now go to image>adjustments>hue/saturation and reduce your woman’s saturation to -25.
Step 14
Now cut out a photo of a bird wing, and paste this over your woman, joining the wing to her back. I also rotated the wing to make the angle more realistic, and went to filter>sharpen>sharpen to bring out the detail of the wing, as the original photo was a little blurred.
Step 15
Now use your eraser brush, and smudge brush, to gently blend the wing into the woman’s back. Then reduce your wing layer’s opacity to 0%, and use your lasso tool to cut away parts of the wing that are overlapping the woman’s hair. Then, with your hair selection in place, bring the wing layer’s opacity back up to 100%, and hit delete. This will give the impression that the woman’s hair is in front of the wing.
Step 16
Now go to image>adjustments>levels and apply the settings shown below. This will make the wings more intense.
Step 17
Go to image>adjustments>color balance and apply the settings shown below:
Step 18
Now duplicate your wing layer, and move the duplicate below your ‘woman’ layer. Go to edit>transform>rotate and rotate it so that it appears to be behind/beneath your original wing. Then go to image>adjustments>brightness/contrast and reduce your brightness to -60, and your contrast to -40.
Step 19
Now select your original wing layer and go to blending options. Apply a subtle drop shadow (settings below), in order to help give your piece depth.
Step 20
Now paste in a photo of a feather. In this example, the feather has a plain black background. There is far too much detail in the feather to cut it out using the magic wand, or pen tools, so we must use the color range tool.
First hide all layers apart from your feather layer. Then go to select>color range. And choose ‘reds’ and your color range. This will select only the red parts of your layer (i.e.: your feather).
Now hit ‘OK’ and then copy/paste your selection onto a new layer called ‘feather’. I wanted to make my feather slightly more bold, so I duplicated this layer, and merged it down with the original.
Step 21
The feather is obviously the wrong color to match the rest of our piece, so I go to image>adjustments>hue/saturation and apply the settings below:
Step 22
Then I go to image>adjustments>levels and apply the settings below:
Step 23
To finish up, duplicate your feather layer MANY times, and resize/rotate each feather, to give the impression that feathers are falling from the wings. To create a cool perspective, make the feathers that are nearer to you much larger, and apply a gaussian blur effect. Apply a lesser blur to those feathers in the ‘mid range’ of perspective, and no blur to the smaller feathers that are nearest to the angels wings.
And We’re Done!
You can view the final outcome below. I hope that you enjoyed this tutorial and would love to hear your feedback on the techniques and outcome.
No comments:
Post a Comment